Configure CSS AV for S3 Integration
When to enable CSS AV Integration
You should use CSS AV process if:
- External Vendor app (V7, Labelbox etc) needs to Read or Read/Write to S3 bucket
- External Vendor access to S3 bucket on which user copies/writes file is prohibited
- Pattern followed is user copies/writes places file to staging bucket
- CSS Scan the file, if there is no vulnerability file is copied to Prod/App bucket
- User is provided with RW access to staging and R access to Prod/App bucket
- External Vendor app is provided with R or RW access to PROD/App bucket
Prereq. to enable CSS on a new staging and app buckets
- Staging and PROD/APP bucket enabled with Encryption preferrably Customer Managed Keys
CloudStorageSecAgentRole-ewx0ycmIAM role has permission to KMS key- Refer v7-prod KMS Key alias key policy as an example
CSS AV Integration Workflow

Adding New Staging Buckets to CSS V7
In order to add new staging buckets to CSS V7, you need to follow these steps:
1. Enable bucket protection for the new staging bucket in CSS.
-
Connect to Roche VPN and Logon to CSS AV management console
- Password is stored in 1Password under “Cloud Storage Security S3 Scan Admin”
-
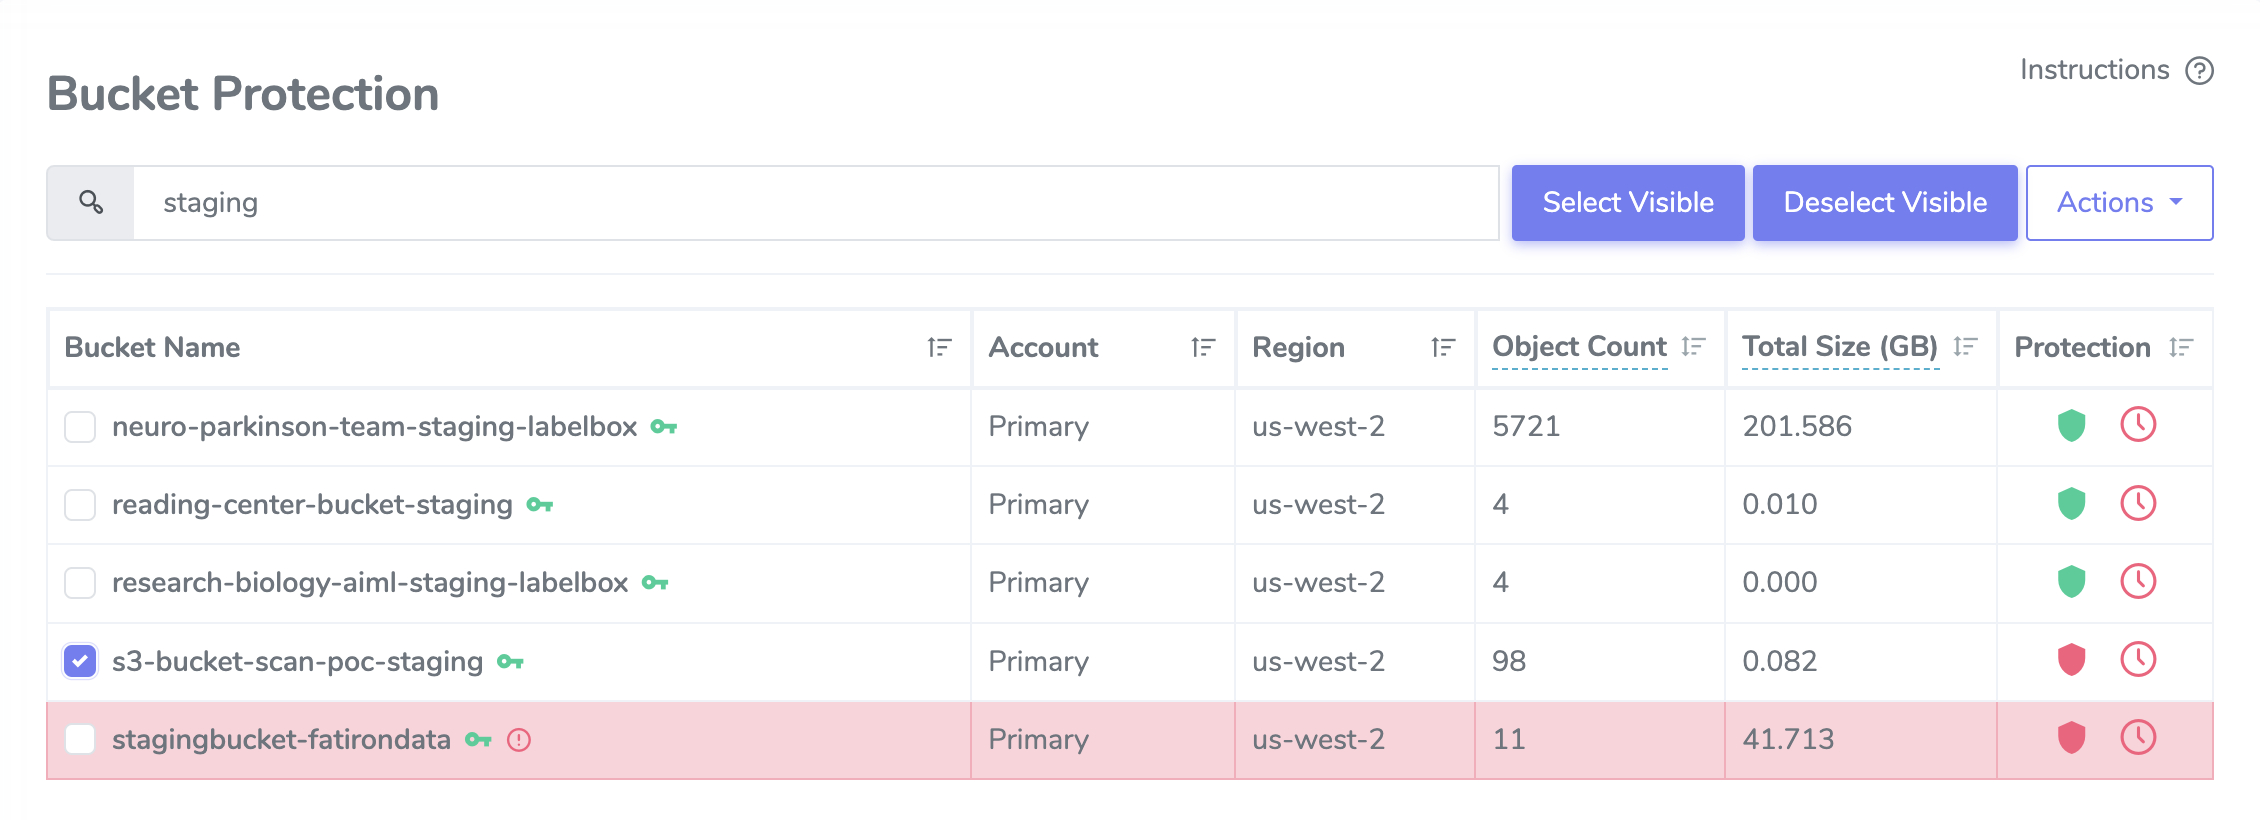
After login, On the left hand menu, select Bucket Protection menu option.
- You should see a table with a list of S3 buckets for ACE Prod AWS account
712649426017.
- You should see a table with a list of S3 buckets for ACE Prod AWS account
-
On search box, type staging bucket name that you want to enable Antivirus scanning. - Based on search bucket list will small
-
Select the desired bucket. You should see a green key icon next to the name of the bucket.
- Green key icon means the bucket is encrypted and Antivirus application can access it.
- Red key icon means the bucket is encrypted but Antivirus cannot access it.
- if you mousing over green or red key icon should give you this information as well.
-
On far right of the bucket, under Protection column,you should see a red shield icon. Mousing over it will tell you that real-time protection of the bucket is not enabled.
-
Click on the icon to enable real-time protection and it will turn the icon green.
-
A dialog window asking to scan the bucket will pop up after enabling real-time protection. Skip this step by clicking the
Don’t Scanbutton.

Done! Your staging bucket should now automatically scan any new files that get added to the bucket.
2. Configure new staging bucket to sync to its corresponding app bucket in CSS.
Now we need to enable staging buckets to sync to their corresponding app bucket.
-
Expand Configuration on left side menu and select Proactive Notifications, A table with AWS lambda function - av-sync-to-prod be displayed.
- This lambda function will copy new s3 object from staging bucket to it’s corresponding app bucket after an antivirus scan with a “clean” result has been completed.
-
Select … on far right and choose Edit Filters from drop-down to modify the configured notification.
- It would show AWS primary account, type of scan (in this case “clean”), and list of staging buckets that have enabled syncing to production/application buckets.

- Click at the blank space after the last bucket, it will a drop-down list of all the s3 buckets in the AWS account.
- It would show AWS primary account, type of scan (in this case “clean”), and list of staging buckets that have enabled syncing to production/application buckets.

- Select your bucket from the list and click the Update Filter button to save your bucket to the configuration.
3. Validate and Enable s3 object sync between staging and app bucket in AWS.
Once CSS update is complete a new event notification called CloudStorageSecS3Event-ewx0ycm is created in S3 staging bucket.
This event notification is responsible to sync files from staging to app/prod bucket.
- The sync flow looks like this:
S3 Upload Event triggers > SNS (CloudStorageSecTopic-ewx0ycm) > Triggers Lambda (av-sync-to-prod) > update app/prod bucket
-
Log in to AWS console and Double check if the event notification has been added under
staging bucket > properties > Event notifications > CloudStorageSecS3Event-ewx0ycm -
Above sync flow works only if new staging and app bucket names are added to lambda function. Follow below steps to add it:
2.1 Log into AWS console and search for Lambda service.
2.2 Open lambda, search forav-sync-to-prodand select it.
2.3 Click the code tab underav-sync-to-prod, selects3_buckets.py2.4 Add a new entry with your'staging': 'app bucket'and click deploy to save the changes.
Contents of s3_buckets.py: (sample)
buckets = {
            's3-bucket-scan-poc-staging': 's3-bucket-scan-poc-prod',
            'reading-center-bucket-staging': 'reading-center-bucket-prod',
            'user-labelbox-digital-pathology-dataset': 'labelbox-digital-pathology-dataset',
            'research-biology-aiml-staging-labelbox': 'research-biology-aiml-labelbox',
            'neuro-parkinson-team-staging-labelbox' : 'neuro-parkinson-labelbox-prod'
        }
4. Enable s3 object Deletions between staging and app bucket in AWS.
4.1 Lambda Update:
Delete between staging and App bucket is done through event notification on S3 and entries to Lambda sync-delete-to-prod.
- The Deletion flow looks like this:
Delete a file in staging bucket > S3 delete Event triggers > Triggers Lambda (sync-delete-to-prod) > delete the file in app/prod bucket
Above deletion flow works only if new staging and app bucket names are added to lambda function. Follow below steps to add it:
- Log into AWS console and search for Lambda service.
- Open lambda, search for
sync-delete-to-prodand select it. - Click the code tab under
sync-delete-to-prod, selects3_buckets.py - Add a new entry with your
'staging': 'app bucket'and click deploy to save the changes.
4.2 Event Notification:
- Log into the AWS console and search for the S3 resource.
- Search for your new staging bucket and select the bucket.
- Select the
Propertiestab and scroll down toEvent notificationssection. Click theCreate eventnotification button.

-
On create event page,type the name as
delete-s3-object-event. -
Scroll down to
Object removalsection and selectAll object removalevents checkbox.

- Scroll till the bottom to
Destinationand selectLambda functionas the destination and choosesync-delete-to-prod

- Click
Save changes.
5. Final Validation
If you followed the steps carefully, the adding and deletion syncs have been configured. To check if the process works as expected:
- Create a file in the staging bucket
- Double check if it has been moved in the prod/app bucket
- Then delete the file in staging bucket.
- Double check if the file has been removed from prod/app bucket sucessfully.
Troubleshooting
This section provides guidance on basic troubleshooting and the key log files that contain log data useful for troubleshooting.
AWS Resources
Cloudwatch Log Groups
- Under log groups search for
CloudStorageSecurityfor a full list of log groups. - Here are some of the key log groups to check for errors if issues are noticed:
- Agent.ScanResults
- Agent.SystemEvents
- Console.System
- Console.EcsConfig
- Console.AgentConfig
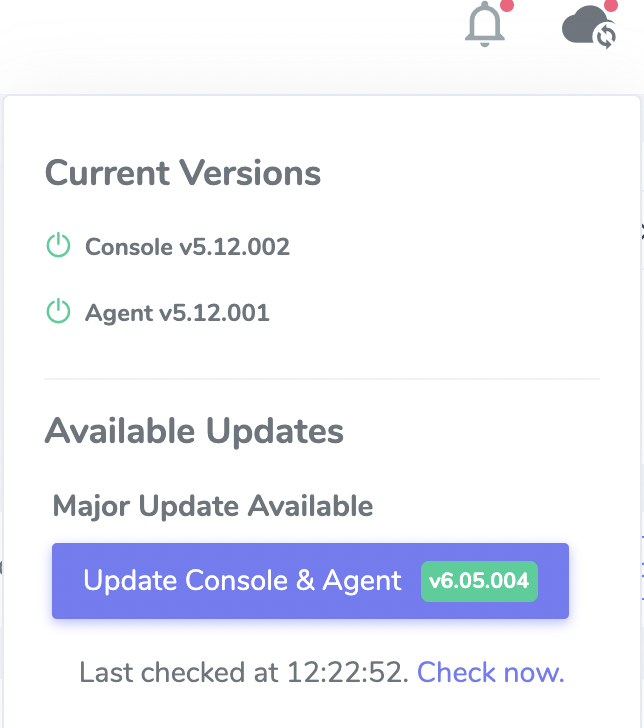
CSS Updates
- Before doing any major updates, all minor updates must be applied first
- To upgrade log into the tool using this link (VPN is required).
- On the top right, click the cloud icon and select version upgrade required
Video Reference
https://drive.google.com/file/d/1vhAZ93-SoLgKUQZgNFKb_B3hexpHrhh5/view