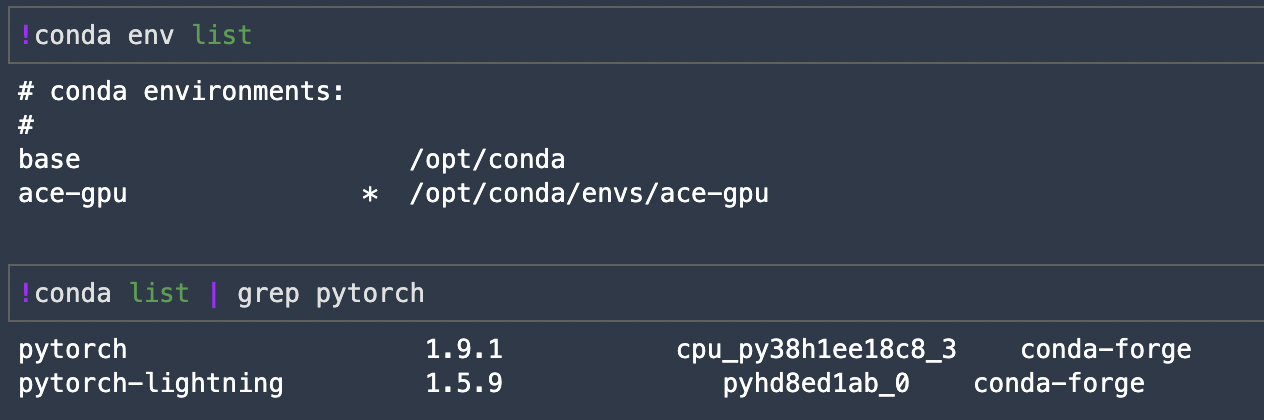
Background
In June 2022, Spell announced that it would be discontinuing their Spell ML platform forcing us to find a replacement solution to satisfy our model development and training needs. As a result, we have (tentatively) selected Amazon Sagemaker.
Terminology
| Term | Definition |
|---|---|
| Sagemaker | Amazon SageMaker is a fully managed service that provides every machine learning (ML) developer and data scientist with the ability to build, train, and deploy ML models quickly. |
| Sagemaker Studio | Amazon SageMaker Studio is a web-based, integrated development environment (IDE) for ML that lets you build, train, debug, deploy, and monitor your ML models. Amazon SageMaker Studio provides all the tools you need to take your models from experimentation to production while boosting your productivity. You can write code, track experiments, visualize data, and perform debugging and monitoring within a single, integrated visual interface. |
| Sagemaker Domain | An Amazon SageMaker Domain consists of an associated Amazon Elastic File System (Amazon EFS) volume; a list of authorized users; and a variety of security, application, policy, and Amazon Virtual Private Cloud (Amazon VPC) configurations. To use Amazon SageMaker Studio, Amazon SageMaker Studio Notebooks, and RStudio, you must complete the Amazon SageMaker Domain onboarding process using the SageMaker console. For more information about Amazon SageMaker Domains, see Amazon SageMaker Machine Learning Environments. |
Sagemaker Feature Status
| Sagemaker Feature | Pre-Sagemaker Analog | Status | Documentation |
|---|---|---|---|
| Studio Notebooks | Spell Workspaces | Ready | Studio Notebooks |
| Sagemaker Training Jobs | spell run CLI command | See documentation link for present state and roadmap | Sagemaker Training Jobs |
| WandB Integration | Spell WandB Integration | Ready | WandB |
| Custom Images | N/A | WIP. See GitHub Issue for details | Custom Images |
Sagemaker Advantages
| Topic | Details |
|---|---|
| Infrastructure Management | Spell was a pain to provision and maintain, consuming a lot of Infra Team time. Sagemaker is comparatively easy. |
| S3 Bucket Attachments | Spell could only mount S3 buckets in ReadOnly mode. Sagemaker bucket attachments can be configured granularly with IAM to support teams’ desired workflows. |
| Access Control | Spell did not support OIDC/SAML so we were forced to integrate with LDAP which further increased Infra Team burden. Sagemaker is an AWS product and thus provides seamless integration with AWS capabilities, including IAM and federated identity management. |
Sagemaker Disadvantages
| Topic | Details |
|---|---|
| Python panel widget performance issues | See this GitHub issue for details. This issue has been escalated to AWS support and they are looking into it. |
| No S3 mounting feature like SpellFS | SpellFS provided a performant S3 mounting solution that let folks interact with S3 like a POSIX filesystem. Sagemaker offers no such solution so we’re researching optimization options. See this GitHub issue for more information. |
Project Team
Our ecdi-ace-sagemaker Slack channel where we’ve assembled our Tiger Team for Sagemaker R&D communication.
Project Status
We’re managing the Sagemaker deployment via this Sagemaker epic.
Known Issues
For a complete list of open issues please refer to this Sagemaker epic. In this section I want to call out a few of the major items that you’ll probably notice.
-
Users can’t stop their own training jobs - This is an issue with IAM session tag inheritance and will impact other user activities. I’ve explained the root cause in significant detail and am working on a solution.
-
SSO users’ Sagemaker Studio profiles must be manually created
Studio Notebooks
NOTE: As of September 22, this functionality has been handed over to our Sagemaker Tiger Team for testing, the feedback from which will enable me to tune the configuration to suit our needs.
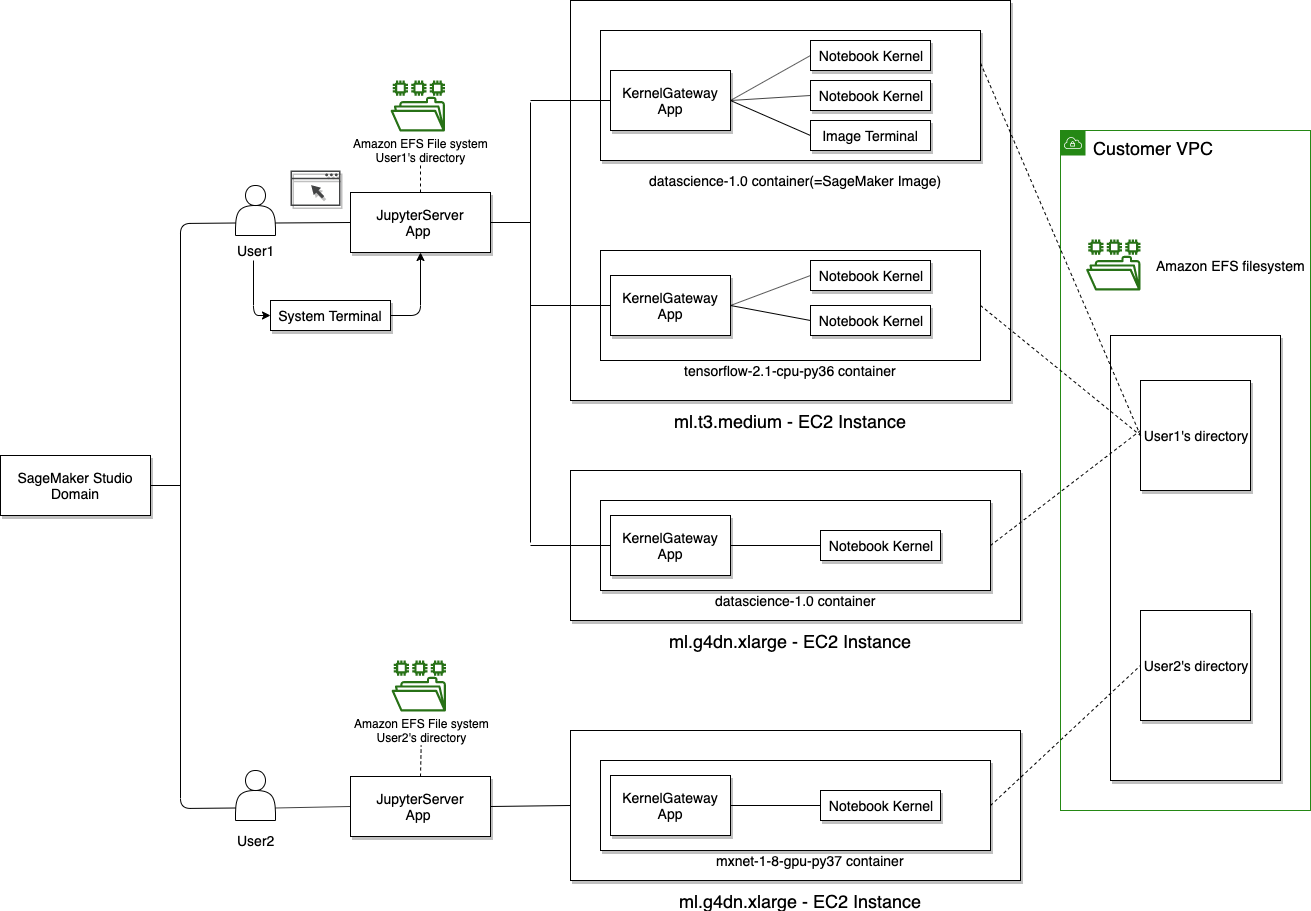
Architecture
This is an AWS diagram to provide a high level understanding of the topology. I’ll replace with something customized for our environment when I have more time.
QuickStart
To create and use a Studio (Jupyter) Notebook:
- Login to AWS Console
- Go to Amazon Sagemaker
- Find your username in the Users panel at the top of the page.
- Click the orange Launch App menu and select Studio
NOTES
- If you don’t see your username in the list please ping
@toddmichaelin the Slack channel and I’ll get you setup in short order. - Initial Studio launch will take about two minutes to fire up. Subsequent launches will be much quicker.
ACE Controls & Features
The following controls/features are currently implemented:
- Each onboarded user has their own user profile, tagged with their name and team.
- Permissions enable users to access their apps, but not other’s apps.
- Permissions provide the following S3 permissions:
- read from any dataset bucket as well as the default Sagemaker bucket (
s3://sagemaker-us-west-2-712649426017). - write to the
/publicand/${user-profile}paths of the Sagemaker bucket, but nowhere else. - Users can share notebook snapshots via the console. Shared snapshots are saved to
s3://sagemaker-us-west-2-712649426017/public.
Caveats
Attribute Based Access Controls (ABACs)
I’m actively working on an implementation of ABACs (tag based access control) to enable teams to share resources and data within Sagemaker while simultaneously preventing access from team non-members).
At a high level it’ll work like this:
- Every Sagemaker user (the Principal) will be created with tags that include their
Teamassignment. - Every Resource (Sagemaker resources, S3 data) will similarly be tagged with
Teamassignment. - Sagemaker actions will be permitted/denied based on whether or not the Principal
Teamtag matches the ResourceTeamtag.
This more advanced IAM work takes a bit of effort to get right so I expect we’ll run into issues. At present, I’m erring on the side of being MORE PERMISSIVE then less so as not to slow Tiger Team R&D, but I’ll be rolling this out during this test phase so that it’s completely dialed in before we go to production.
Next Steps
Infra Team’s top 3 priorities are as follows:
- Continue tuning ABACs to provide team-level resource isolation
- Restrict Public Access to Sagemaker Studio Notebooks (VPN/Office Only)
- Devise a Sagemaker S3 Data Workflow with Tiger Team
Your next steps largely depend on your Sagemaker comfort level. For those unfamiliar with Sagemaker Studio, there’s a useful tutorial that I used to run through the complete lifecycle for testing permissions.
Build, train, deploy, and monitor a machine learning model with Amazon SageMaker Studio
If provides a copy/paste driven workflow that you can use to get the lay of the land before you start using it for your own purposes.
Please report results and submit feature requests to me via Slack. I very much expect that you’ll run into permissions issues so ping me in Slack with your error message and I’ll fast track a fix.
Sagemaker Training Jobs
Sagemaker Studio is fine for model development, but model training is more effectively done using (training) jobs in much the same way that spell run was for Spell.
Today, unlike spell run, Sagemaker Training Jobs requires some coding. To simplify the process for new users, Abi, our AWS consultant, is developing some boilerplate code that we can use to get up to speed more quickly. See our sagemaker-examples repository for present state.
We acknowledge that while this is an acceptable first pass, the better long-term strategy is to wrap this and other essential Sagemaker functionality into a command line interface (CLI) very much in the spirit of the Spell CLI. I will be breaking ground on this project upon my return from PTO on October 31. Refer to our Sagemaker CLI epic for more information.
Step by step guide to launching training jobs
Notes: Launching a sagemaker run will copy your current code directory to an EC2 machine and then launch whichever script you tell it to. The requirements for the machine will by default install from requirements.txt in the root directory if no image is specified for the EC2 machine. The way the launcher works by default, it expects to input parameters to the in the equivalent of command line arguments, that would normally be read by argparse. If you have a different way of reading in parameters, such as hydra, a different configuration for your launcher file might be necessary.
- Ensure the terminal you plan on launching the job from has the correct AWS access keys set (set with export AWS_ACCESS_KEY_ID=<your key> and export AWS_SECRET_ACCESS_KEY=<your key>)
- Ensure your local environment has the sagemaker library installed (pip install sagemaker)
- Create a launcher file for sagemaker where you will define a Sagemaker Estimator. An annotated pytorch example is attached here.
- In your terminal run your sagemaker launcher file with python <file_name.py>
- You should be able to monitor your run in the terminal. Some information can also be obtained from going into Training > Training Jobs in the Sagemaker web app.
- The required Python packages will be installed automatically, drawing upon the specifications listed in the requirements.txt file. This file is anticipated to reside in the same directory as the SageMaker launcher file.
Sagemaker Estimators
- Start with the intuitive explanation of Sagemaker Estimators by user ‘mon’ in this StackOverflow question.
- Official documentation of Python SDK -> Estimators: A high level interface for SageMaker training. This is a good reference when attempting to repurpose and/or modify this example.
- Always verify the spelling of the Estimator kwargs, as there is no built-in system to check for invalid kwargs
Warm Pools
SageMaker Managed Warm Pools let you retain and reuse provisioned infrastructure after the completion of a training job to reduce latency for repetitive workloads, such as iterative experimentation or running many jobs consecutively. Subsequent training jobs that match specified parameters run on the retained warm pool infrastructure, which speeds up start times by reducing the time spent provisioning resources.
As of 02 December, the following node types are supported
ml.c4.2xlarge
ml.m5.4xlarge
ml.p3.2xlarge
ml.p3.8xlarge
Additional node types can be added upon request. Please see this Slack discussion thread for questions and answers on this topic.
WandB Integration
To get started, see WandB Sagemaker Integration documentation.
A few tips from our community:
Genentech WandB URL Config
Per this Slack thread, integration requires explicitly calling out the Genentech custom URL. The default will not work.
Python Way
wandb.login(host='https://genentech.wandb.io/')Bash Way
wandb login --host https://genentech.wandb.io/WandB Feature Flags (e.g. Instant Replay)
Per this Slack thread some of WandB’s integration docs are out of date leading to some confusion on how to add Instant Replay to your user profile. The Slack thread provides the solution in case you also find the docs to be inaccurate.
Notebook Instances
Summary
Notebook Instances are EC2 instances running Jupyter Server. They’re considered a legacy solution that should only be used when AWS’ newer/preferred solution, Sagemaker Studio Notebooks, does not satisfy user requirements. See this comparison between the two for more a list of the reasons why they recommend Studio Notebooks over Notebook Instances.
When we first started using Sagemaker a few months ago, I explicitly blocked usage of Notebook Instances so as to dissuade their use, but changed course in November 2022 to provide a workaround for users blocked by a Studio Notebook panel widget library issue.
New Instance Instructions
Notebook Instances take a bit more configuring than Studio Notebooks so this section will provide instructions for setting the correct values in the AWS console. It’s important to follow these instructions as our IAM rules explicitly block non-compliant settings. In the interest of brevity I’ll only call out those fields that are important for our purposes. Anything not explicitly mentioned can be configured to support your use case.
From the Sagemaker UI, select Notebook —> Notebook Instances from the left panel, or click this direct link, and click Create Notebook Instance to begin setup and complete the form using the reference table below.
NOTE: If a section/field is not referenced below, you can set to whatever works for your use case..
| Section | Field | Value(s) |
|---|---|---|
| Notebook instance settings | Notebook instance name | Any name that identifies the instance, prefixed with your UNIX ID. |
| Permissions and encryption | IAM role | - AI Team: gred-ecdi-sagemaker-dev-role- CIG Team: gred-ecdi-sagemaker-cig-team-role |
| Network | VPC | vpc-0e59d54ca7fb6f8aa (10.17.144.0/20) ace-svcs |
| Network | Subnet | Any of the three gcore-transit-private subnets |
| Network | Security group(s) | The one that begins with gred-ecdi-sagemaker-sg-notebook-instance-default- |
| Network | Direct internet access | Disable |
| Tags | Key: Team | ai-team or cig-team |
| Tags | Key: SagemakerUsername | your_unix_id |
NOTE: For Git repositories: If you would like to attach a Git repository that is not available in the dropdown please contact ACE-Infra.
Custom Images
As of October 15, we have exactly one manually created custom image available to Sagemaker users.
ACE-GPU Custom Image
See README.md for (re)build instructions and limitations.
More will follow upon my return from PTO (October 29) as will a GitHub Actions driven pipeline to enable self-service updates.
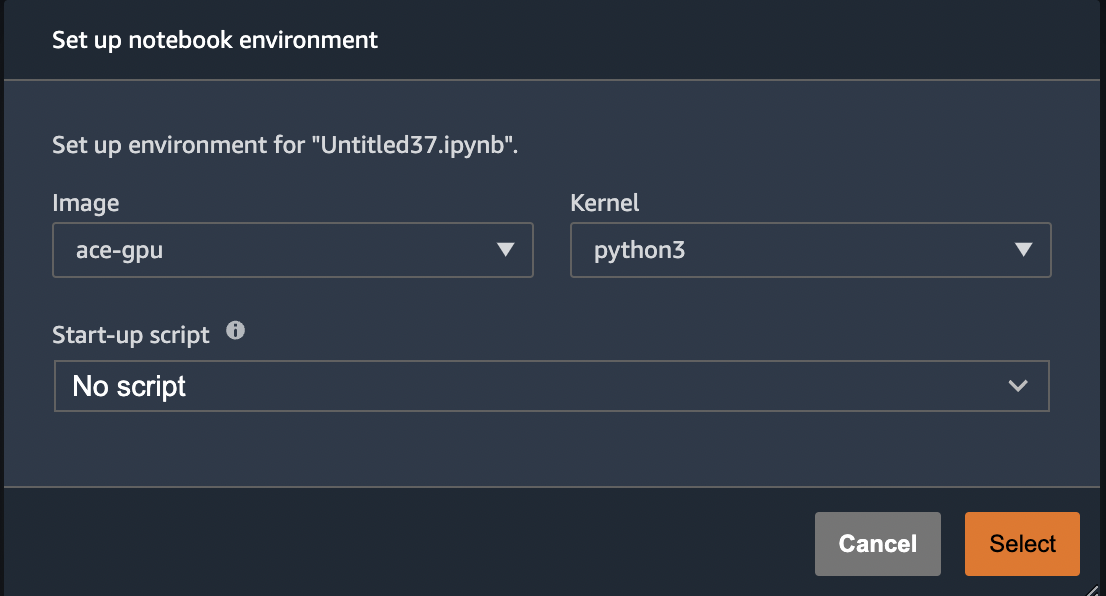
In the meantime, to use the image in Sagemaker Studio simply select the custom image from the image dropdown. The first time you do this, it will look like screenshot below. Note that the selected python3 kernel is NOT the custom Conda environment built into this image. We’ll get to that next.
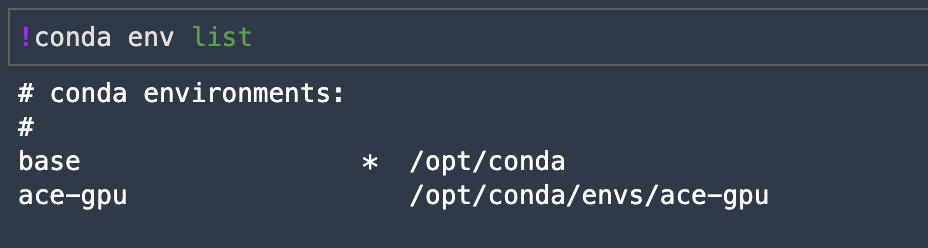
As mentioned above, this image includes a custom (ace-gpu) Conda environment where all of our dependencies are installed, but due to a little quirk of Conda and/or Jupyter we cannot see or select our custom environment kernel the first time we launch the image. The screenshot below shows our initial launch. Notice that we’re in the base environment, not our ace-gpu environment.
Experienced Conda users can activate the environment here and get to work. Alternatively, just launch a new notebook on the same instance and you’ll now see the option to pick our custom kernel.
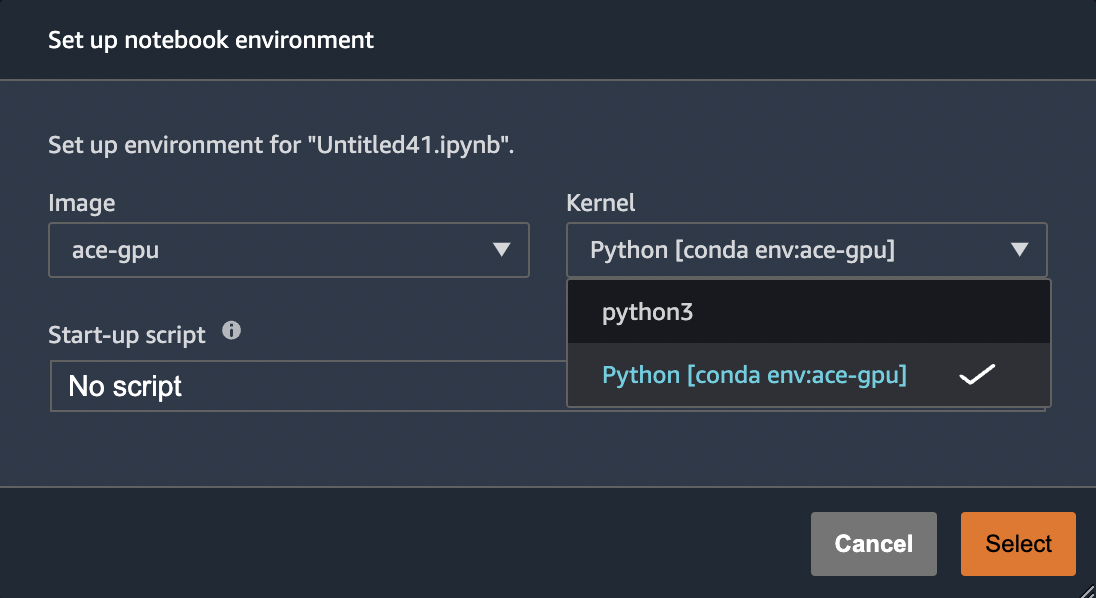
And once launched we can now see that we’re indeed running our custom Conda environment
Upon my return from PTO I’ll try to find a way to make our custom kernel immediately visible.
Cost Management
We have several Cost Explorer reports for tracking Sagemaker costs.
| Cost Explorer Report | Description | Notes |
|---|---|---|
| sagemaker-by-team | Tracks Sagemaker costs by ACE Team tag | While IAM does enforce users to include a Team tag when submitting jobs, it’s currently not possible to verify that the Team tag matches the user’s assigned team. I’ve added comments to the code to explain why. I’ve since learned from members of AI teams that this would actually prove problematic as users do sometimes do work that should get assigned to teams that might not be their officially assigned team so current state will suffice. |
| sagemaker-by-user (v1) | Tracks Sagemaker costs by ACE Username tag | This will probably be removed in favor of sagemaker-by-user (v2). |
| sagemaker-by-user (v2) | Tracks Sagemaker costs by AWS sagemaker:user-profile-arn tag | This is an improvement on our sagemaker-by-user (v1) report as it’s based on an AWS injected tag that doesn’t require a bunch of IAM logic to force users to add a Username tag. |
FAQ
Can I use Spot Instances with Sagemaker Studio?
- Spot instances are not available for Sagemaker Studio Notebooks.
- Spot instances are available for launching training/processing jobs.
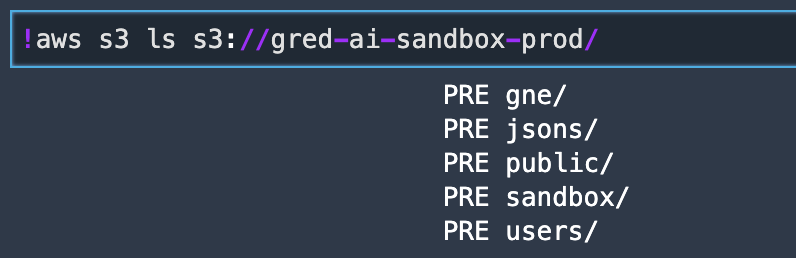
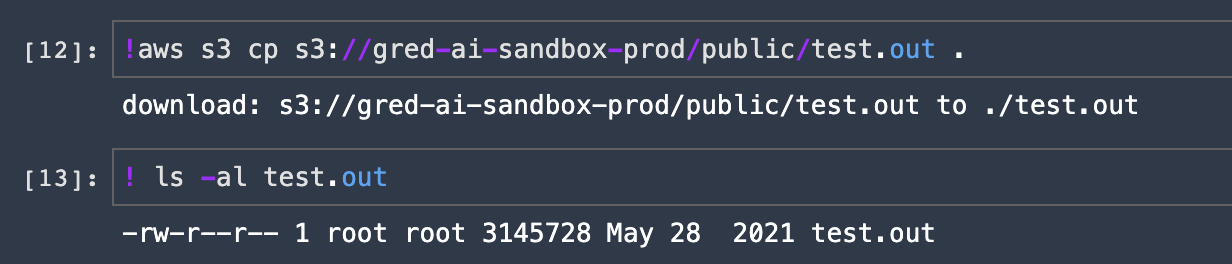
How do I interact with S3 buckets in Sagemaker Studio?
NOTE: These are a few examples that work out of the box. This is a topic that has garnered a lot of interest so I’m collaborating with members of the AI Team and performing some R&D to assess the costs and benefits of the various S3 integration options. As soon as I have results I will post them with the goal here being to present the most performant solutions.
AWS CLI
Sagemaker Studio runs with an assumed role that has the requisite IAM permissions to interact with S3 so the authentication piece is already covered. Furthermore, Sagemaker Studio Notebooks come preinstalled with AWS CLI so you can simply run aws s3 commands.
NOTE: When running commands from the Jupyter Notebook (iPython (ipynb)) interface, you must prefix these commands with a !. When running from a terminal this is not required.
List bucket contents
Copy a file to local workspace
See AWS CLI v2 —> S3 documentation for more information.
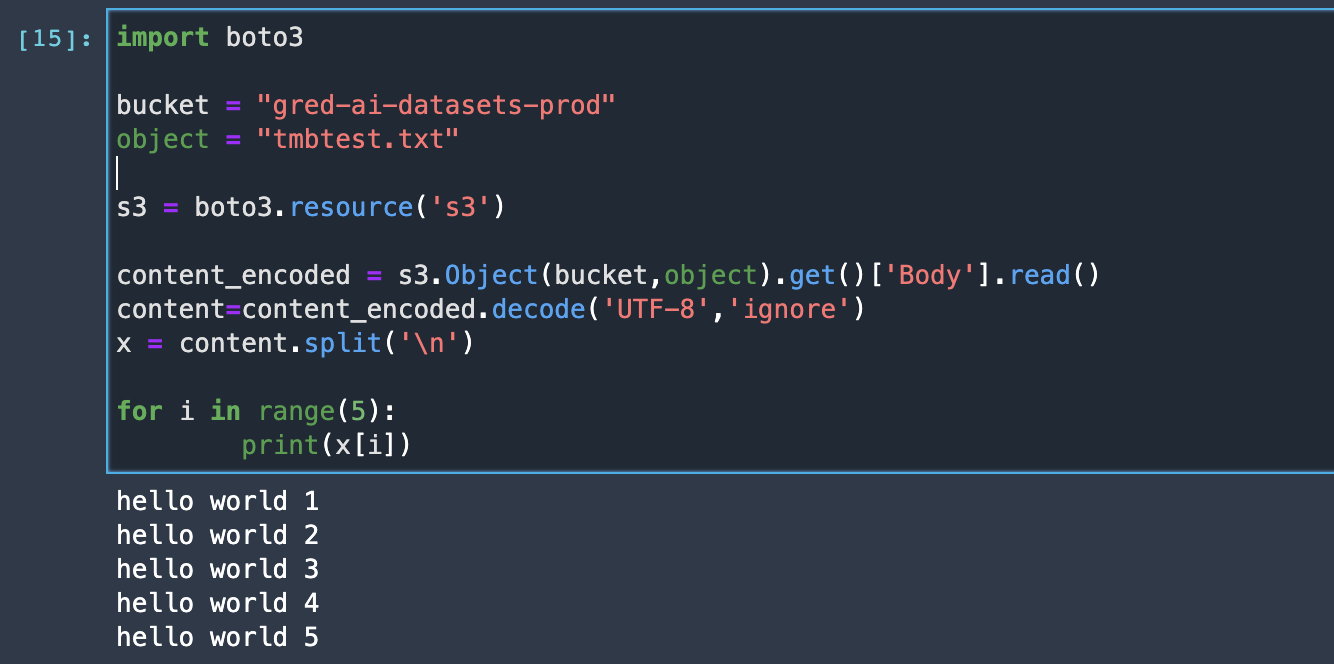
AWS SDK for Python (Boto3)
Many ways to do this so sharing two examples for reference.
See Boto3 —> S3 documentation for more information.
CLI Cheatsheet
Primarily for my Infra peeps, but encourage others to add entries here too to help others getting up to speed.
List User Profiles
The jq bit is only there if you want to extract particular fields. Otherwise omit it and you’ll get everything.
$ aws sagemaker list-user-profiles | jq '.UserProfiles[].UserProfileName' | sort
"abbaspom"
"bookere1"
"byersr"
"hejratis"
"iriondoc"
"paakm"
"palasams"
"pandity"
"pelya"
"tmbtest"
"tmbtest2"
"xander"
List apps - It is useful when you want to get the status of apps, whether they are InService or Deleted
$ aws sagemaker list-apps
You can do the same thing via AWS Console: Amazon Sagemaker > Domains > (choose between domains) > ( choose a user profile)
Get more information about a specific app
$ aws sagemaker describe-app --domain-id <domain_id> --user-profile-name <user> --app-name <app_name> --app-type <app_type>
Resources
| Resource | Description |
|---|---|
| gRED-ECDi Sagemaker Examples Repository | Parking lot for Sagemaker examples curated by AWS PS and gRED-ECDi members |
| gRED-ECDi Sagemaker Infra Code | Terraform code used to provision and configure our Sagemaker domain and ancillary resources |
| Consolidated MLOps Requirements | Requirements document put together by AI & Infra Teams identifying features that we’d like to see in our Spell replacement solution. |
| Spell Documentation | Good to have a Spell reference as we migrate from old to new. |
| Sagemaker Examples | AWS GitHub repo containing example Jupyter notebooks that demonstrate how to build, train, and deploy machine learning models using Amazon SageMaker. |
| MLOps foundation roadmap for enterprises with Amazon SageMaker | In this AWS blog post, you learn about the key phases of building an MLOps foundations, how multiple personas work together on this foundation, and the Amazon SageMaker purpose-built tools and built-in integrations with other AWS services that can accelerate the adoption of ML across an enterprise business. |
| Controlling and auditing data exploration activities with Amazon SageMaker Studio | This post walks you through the steps to implement access control and auditing capabilities on a per-user basis, using Amazon SageMaker Studio notebooks and AWS Lake Formation access control policies. This is a how-to guide based on the Machine Learning Lens for the AWS Well-Architected Framework, following the design principles described in the Security Pillar. |
| Amazon Sagemaker Projects | AWS documentation for creating end-to-end ML solutions with CI/CD by using SageMaker projects. |
| Sagemaker Pipelines | AWS documentation for creating and managing Sagemaker Pipelines. |
| SageMaker MLOps Project Walkthrough Using Third-party Git Repos | This walkthrough uses the template MLOps template for model building, training, and deployment with third-party Git repositories using CodePipeline to demonstrate how to use MLOps projects to create a CI/CD system to build, train, and deploy models. |
| Distribute Training with Sagemaker SDK | Example code for MPI, PyTorch and Tensorflow. |
| Distributed Training using Pytorch Lightning | AWS blog explaining how Amazon Search has run PyTorch Lightning with the optimized distributed training backend in SageMaker to speed up model training time. |
| Sagemaker Python SDK | SageMaker Python SDK is an open source library for training and deploying machine learning models on Amazon SageMaker. |
| Using Amazon ECR with AWS CLI | AWS documentation covering the steps needed to push a container image to a private Amazon ECR repository for the first time using the Docker CLI and the AWS CLI. |
| Sagemaker Training Toolkit | Example code for using a custom image with Sagemaker SDK. |
| Bringing your own custom container image to Amazon SageMaker Studio notebooks | Blog post explaining how to use a custom image with Sagemaker Studio. |
| Dive deep into Amazon SageMaker Studio Notebooks architecture | AWS blog post that details how Studio notebooks have been designed to improve the productivity of data scientists and developers. Recommended by Abi to answer some of the data scientist questions regarding the different terminals and their use cases as well as the difference between the Jupyter Server and Kernel Gateway environments. |
| Sagemaker IAM actions, resources, and condition keys | Provides all actions, resources, and condition keys for Amazon SageMaker. Great resource for administrators to manage Sagemaker IAM policies. |
Troubleshooting
Logs
- Where can I find the logs of Sagemaker?
We are saving Sagemaker logs via Cloudtrail and saving them in OpenSearch
You can get access to Sagemaker logs via this link.
For more information on searching terms and getting logs from a specific time, please check OpenSearch Document.
Command Line Kungfu
Coming soon